Monday, March 18, 2013

Changing The Sand In A Sand Filter


Changing the sand in a sand filter
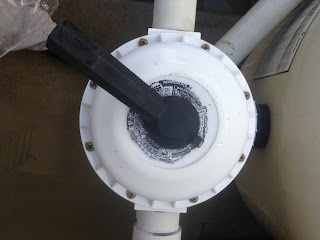
This post will cover how we change the sand in a Pentair Triton II TR-100 sand filter written by www.WCPandS.com. (Image from pentairs main site)


This is not meant to act as a complete standalone guide on how to change the sand. Wine Country Pools is not responsible for any damage occurred from use of this article. If you are not sure about working with a sand filter find a local professional to perform the work.

Getting started
It is recommended to allow the sand filter to sit off, drained of water and open for a few days to allow the sand to dry. To do this, turn off the pool system and make sure that the system will not come back on automatically. The easiest way would be to turn off the breakers for the pump.

Now open the air relief valve at the top of the filter.

Remove the top of the filter. The top will unscrew. There is a tool called a “6 inch wrench” that comes with the filter that makes this process easier. If your filter is missing this tool, you can turn lid by hand.


Remove the drain plug from the bottom of the filter by unscrewing it.

It can take 2-3 days for all of the water to drain and the sand to dry. In this example, we had less than 24 hours so it will show the process with wet sand.

Removing the sand
There is about 600lbs of sand and/or gravel in a TR100 sand filter. The old sand, once removed, will need to be moved somewhere. Find this location before starting the removal.

Looking down into the inside of the filter, you can see the “Diffuser Assembly.” This can be unscrewed.

There is a “Tube Air Relief” that passes through the top if the screen cap is pulled off. As you turn the “Diffuser Assembly,” push this tube down until it is free from the diffuser.


If the sand is dry, it can be vacuumed out with a shop vac style vacuum. Since the sand in this case was still wet, a plastic scoop was used to remove the sand.

Once the sand level is low enough, the “Piping Assembly” can be unscrewed and removed from the filter.


To keep it out of the way, I stuck the “Tube Air Relief” through the open hole that was left from removing the “Piping Assembly”.

It took about 45 minutes to remove most of the sand by scooping it out to where the “Laterals” were visible.

The “Laterals” can be soft so the dirt/gravel around them needs to be removed carefully. Your filter may have gravel (rocks) in this area instead of sand. Either way, it all should be removed.

If the sand is still wet when most of the sand/rocks are out, getting the last of it can be difficult. If you only have sand, you might be able to wash the remaining sand out with a garden hose through the bottom open drain. If not, then the filter can be freed by unscrewing the unions.


Note: These unions may be soft and can crack easily.

With the unions removed, the filter can now be moved and/or turned over to allow for the remaining sand to be washed out with a garden hose.


Once finished, place the filter back in to its original position and reattach the unions.


Reattach the drain plug to the bottom of the filter.

Refilling the filter with sand (and maybe rocks)
The Pentair TR-100 sand filter will hold 600lbs of sand or a mixture of sand and pea gravel (small rocks).
There are advantages and disadvantages to using pure sand or some gravel at the bottom and sand on top.
Refer to the table in the owner’s manual (link) on how much of each to use.
A Mixture of sand (450lb) on a bottom layer of gravel (150lb) was used in this case for its increased water flow properties.

The instructions suggest adding water to the filter first. This step was delayed because it was feared that blindly adding the gravel could damage the exiting “Laterals” if the gravel wasn’t filling all of the spaces under them.

If you are using just sand, then fill the filter halfway with water first before slowly starting to add the sand.

If using gravel, slowly start adding in your bottom layer.


Now fill the filter about half way with water.

Before the water/sand level gets too high, reinsert the “Piping Assembly.”

Now reattach the “Diffuser Assembly.” Remember to also pull the “Tube Air Relief” back though. The tube should be easier to maneuver around since the sand level is still low.

Reattach the screen cap to this tube.

The “Diffuser Assembly” was turned to the side to make adding more sand easier. As the sand level gets higher, be sure to move this Diffuser up to keep it out of the sand.

Continue adding the rest of the sand. There should be an 11 inch gap between the top of the sand and the top of the filter.

Finishing up
Reattach the top of the filter by placing it on top and screwing it down. This only needs to be hand tight.


The sand will need to be rinsed before staring the system. Move the multiport valve position on the filter to backwash.

Turn on the system to allow the new sand/gravel to be cleaned.
There isn’t a set amount of time needed to complete this step. It usually takes no more than a few minutes. The water should be a dark brown at first, then change to a lighter brown.

When finished, turn the system off, move the multiport valve back to “hi-flow,” and restart the system.

Open the top air relief valve to remove any air left in the filter and close once water starts to come out.

And it is finished.

Thursday, January 31, 2013

Pool or Spa Turning On and Off Randomly


Pool or Spa Turning On and Off Randomly

This article will focus on one quick fix to the problem of a pool or spa turning on and off randomly written by www.WCPandS.com. This is for in ground pools or spas using a Jandy AquaLink controller with a wired remote (see pictures below if you are not sure that it’s the same as yours). Above ground pools or spas would not apply to this article. The features that can be affected include pool and spa lights, spa booster pump, and the heater (may be connected to the system’s preprogrammed setting marked as “Spa Mode”).  The problem is when these features randomly turn on and off.


Check your controller (usually in the house) and make sure whatever is coming on is not part of the normal schedule. If you are not sure how to do this, it is in the manual.


Note: This article is how we would attempt to fix this issue. Wine Country Pools is not responsible for any damages or injuries incurred by following this article. If you are unsure about step seek a local swimming pool professional. 

A common cause of this problem is a leaking remote. The remote is the 4 bottom key pads that are wired to the main system controller usually in the spa but sometimes just outside but next to the spa. The key pads are set to control the spa booster pump, “Spa Mode”, and the pool/spa lights.

In the picture above you can see one version of what the spa remote looks like. Notice how this one is in the middle position of the tile.

In the picture above notice how the water is now at the controls as the system is running. When the remote develops a leak, water gets inside and completes an electrical connection for one or more of the buttons causing that function to turn off and on repeatedly. On some spas the remote is just above the water line so water gets in when either the spa jets come on  or when users get into the spa for use, both of which cause the water level to rise.

To begin turn off the power to the pool and spa controller.

The best way to do this is to turn off all breakers either at the controller or at the house power panel.
Remove or turn the 9 volt battery cover.

Remove the 4 screws holding the AquaLink control panel cover on with a flat head screw driver.

The top of the cover needs to be pulled out then up from the bottom slots to be completely removed.

At the top of the panel you will see the control board with the wires connecting to the top.

Usually there is a large sticker showing a wiring diagram and listing what each connection corresponds to. This will fade or fall off over time.  If yours is missing or unreadable see the included picture for reference.


At the top of the board, the 2nd set of connectors on the left is for the remote. These six wires need to be removed.

Do not cut these wires as you may need to reconnect them. These can be unscrewed with a small screwdriver.


Twist the wires together and push them out of the way.


Place the panel back on starting with inserting the bottom section in to the open slots then pushing the top section in.

Insert and screw in the 4 screws with a flat head screw driver.
Push down or reattach the 9 volt battery cover.
Turn the breakers back on.
Check if your system is working correctly, turn it on in pool mode and watch to see if it is still randomly turning features on and off. It may take a few days to tell if your system is working correctly.


Wednesday, January 30, 2013

Mako Skimming Net By Oreq Review


Mako net by Oreq review

This is a review by www.WCPandS.com of the Mako LN4200 (POP-40-3017) skimming net with 20 inch regular bag made by Oreq Corporation.

When selecting a swimming pool net it is easy to go with the cheapest net available. However, from my own experience of cleaning pools for the past few years, I know that spending more for a better net is a wise investment. A good net will save you time with better design elements; from a shaped bag to allow for easier pushing and pulling under water to a scoped rim for removing small objects from the pool floor.
The Mako net is not a cheap net, it is a commercial grade net for sale around the $40 range.

What is included: 
The net comes with an extra clip, set of instructions and an ID tag. There was no assembly required.

How it compares to similar nets:
For our own pool routes the Piranha pool nets (made by the Smart Company) are used. I will use those for comparison.

Piranha nets were chosen because the rim design helps when skimming pool floors and the high durability of the net rim. It is a good comparable net since both are commercial grade  and cost the same.

The handles of the Mako nets are plastic and feel flimsy compared to the metal Piranha nets, however the plastic handles never broke or cracked during the net’s lifetime of use.

The Mako does have a lip on the handle that the end of the pole will insert in to. This helps to support the pole giving a more single piece feel.


The bag mesh size is about the same for both nets,  therefore pulling and pushing each underwater takes about the same amount of effort. The durability of the bags is also similar between the two.

Both nets have a scooped rim for removing debris from the bottom of the pool; this is an essential feature for any net. The quality of the scoop is about the same for both nets allowing for small objects to be removed from the pool floors.


How the net performs:
I had a Mako net that I used as my main skimming net for the daily pool routes. The net ended up lasting about 6 months of heavy use (around 40 pools each week). While the Mako net visually looks different from the much more commonly found Piranha it didn’t perform any better or worse in normal use.

Comparing the new and the old nets:
The bag did eventually rip around the upper side section that led to the net’s eventual retirement.

At the rear of the net is a hook to hold the back side closer to the frame.  This broke after a month but did not affect the net skimming ability.


The skimmer rim did not break into parts (which is common for an ageing Piranha net) but the bottom section that scraps the sides and floors did wear down.

This is common for all nets. It would be nice if this section could use a thicker plastic extending the life of the net.

The net was made so that changing the bag and or rim would be easier than most (by not requiring tools with a system of removable parts); however there were times in normal use when the quick release handle would twist off unexpectedly. The hard part of changing a bag is replacing the rim; holding the bag in place is a distant second. While the Mako nets help with holding the net in place it does nothing to help replacing the rim.

Overall
The Mako by Oreq net worked well, it had no major problems and only a few minor inconveniences. It does the job as well as other similarly priced nets. If you already have a favorite commercial grade net there is no reason to change but if you are looking to upgrade the Mako net will not be a disappointment.
8/10