This is a guide for replacing the motor on a Hayward Northstar pump by www.WCPandS.com.
This is not a troubleshooting guide on determining problems with the pump. This
will show the steps on how to remove and replace only.
The Hayward Northstar series pump can be difficult to work with. If you
are unfamiliar with this specific pump and need to replace the motor, I would
suggest calling a local pool service company to change it for you.
Click on any image to see a larger version.
What you would need to replace a
Northstar pump motor
A replacement motor: The
replacement motors for the Hayward Northstar are the round frame motors type. However,
the thread size used for its impellers is not a standard size so you will need
a round frame motor specifically made for the Northstar pumps. I used an AO
Smith SN1102 1hp motor for this job.
The seal: The seal will be
one of two different types used on the Northstar depending on your pump’s age.
It could either be a SPX4000SA2 (for motors made 2003 and after) or a PS-3890 (for
motors made before 2003). Pulling the motor apart and discovering (it would be
obvious once the motor was opened) you had the wrong seal is always bad. They
are about $20 each; if you are unsure of what you need, I would get both seals
and return the one you didn’t use.
O-rings and gaskets: I used a
go kit (Go-KIT66-9) that comes with all of the needed o-rings and gaskets (as well as
a SPX4000SA2 compatible seal).
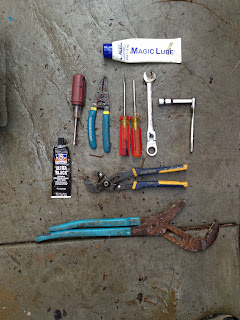
Tools Needed:
-Opened end socket (9/16)
-Socket wrench (9/16)
-Flat head screwdriver
-Phillips head screwdriver (may need to secure power wires)
-A swimming pool filter approved lubricant (use one screw before
screwing them back in)
-Hex head screwdriver (to remove the motor plastic cover and ground
wire)
-Needle nose pliers (to pull and bend the power wires)
May need:
-Pipe wrench (to unscrew the two large unions/nuts to free the
Northstar pump)
-Automotive gasket maker
Beginning
Ensure that the pump cannot turn on automatically or cause an
electrical shock when working with the wiring. The easiest way is to turn off
the breakers at the timer/automatic controller. If you are unsure of how to do
this, then turn off the electrical breakers to the pool equipment at the house.
If you are unsure of how to do this, do not proceed and hire a local
professional.
If you need to clear the area around the pump to have access all around
the pump, do it now before starting any work.
In this specific example, the pump could not be accessed without making
room. The pipe going from the top of the pump to the filter inlet had to be
removed. The filter also needed to be moved to free up space behind the pump to
work on the wiring.
The pump was freed from the filter system by unscrewing the two unions
(one in front and one at the top of the pump) that connect it to the filter
system.
Disconnecting the power wires
and conduit to pull the pump out
Note: Ensure that the power is off before starting these next steps.
If you are not 100% certain the power is off, do not proceed any further.
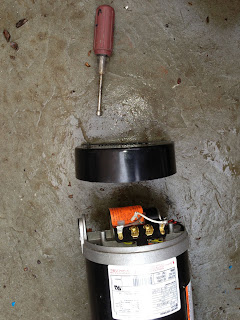
To remove the wires supplying power, first remove the plastic cover
from the rear of the pump.
This cover is held in place with two hex head screws. Once these are
removed, the cover can be pulled straight back and off.
Inside are 3 wires (for a 220v pump): two are power lines (either
matching color or not), and one is ground (usually green, always connected to a
screw off to the side).
Disconnect the two power wires. In this case, they are connected with
clips, but usually they are held down with one screw each.
Disconnect the ground wire by unscrewing the single screw holding it
on.
Disconnecting the conduit elbow
Start by unscrewing the sleeve at the bottom of this connector.
Now pull the conduit back from the elbow to expose the wires.
The wires need to be pulled out of the elbow. Sometimes, it’s easier to
pull one at a time and other times, it’s easier to pull them all out together.
It may help to straighten the wire ends before trying to pull them out.
Remove the elbow from the old motor. In this case, the elbow had the
nut on the outside. Normally, this is on the inside and needs to be unscrewed
first before unscrewing the entire elbow.
You may have a bonding wire connected to the back of the pump. If you
do, unscrew the hex head screw holding the bonding wire to the pump motor.
The pump should now be free and you can now pull the pump out of its
current position. You will want to move the pump somewhere you have better
access to all sides of the unit.
Separating the motor from the
pump housing
There is a handle on the side of the pump connected to the large round
ring that surrounds the pump (called the Motor Lock Ring).
You will notice that there is a clip holding the ring in place. This
clip needs to be pulled up and off.
You can remove the screw holding the clip on if you are unable to
unlatch it.
With the clip off, the handle can now be pulled up.
There is a line on the ring that will align with the top of the pump
when the handle is all the way up.
Once up, pull the ring back towards the motor.
The motor can now be pulled back away from the pump body.
Note: This can be difficult to do, especially if you did not move
the pump to a place where you can get better positioning around it. While
separating these two, keep in mind how difficult they are to pull apart because
it will be just as hard to push them back together near the end when installing
the new motor.
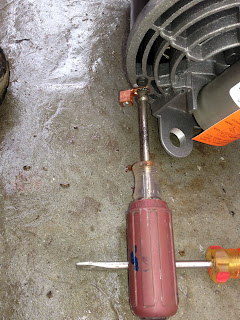
A flat head screwdriver can be
used to help free the two from each other. When using the screwdriver, you want
to free each side a little at a time until the two are separated.
Completely remove the motor from the front housing.
Removing the old motor
Pull off the motor ring (large ring/handle).
Pull off the volute (Diffuser) if it didn’t already fall off.
Pull off the impeller ring.
Pull off the large seal plate rubber o-ring.
The impeller now needs to be unscrewed. If you try it by hand, you will
notice that it just spins on the shaft.
At the rear of the pump under the compactor is the back end of the
impeller shaft. Use the open ended wrench to hold this shaft from spinning.
While holding the wrench, you can now unscrew the impeller. A large
wrench can be used to grip the impeller to spin it off but be careful not to
break it.
While impeller is separated from the housing, make a note of how each
of the two seal parts sits in its respective section. When installing the new
seal, its sections will need to be oriented the same way.
Pull the seal plate away from the old motor. It will now be loose since
it was the impeller that held it in place.
Use the socket wrench (9/16 end) to remove the four bolts from the
motor mounting plate. These could be difficult to remove if calcium has formed
around the bolts.
The mounting plate can now be removed from the old motor.
Attaching the new Hayward Northstar motor to the
mounting plate and impeller
Remove the new motor from its box.
Place the motor mounting plate over the new motor. Notice that the
plate marks the up direction. The top of the motor is the side large white
label (so you can read the motor information once the pump is installed).
Insert and tighten all four bolts into the plate, securing it to the
new motor.
Note: In this case, a lubricant was used on each bolt so that the
next time the motor is worked on, it will be easier to remove these bolts. This
step is not required.
The two seal parts now need to be inserted into the impeller and the
seal plate.
For the impeller, just pull the old seal off. If the bottom section
splits in two parts, just pull the remaining section off.
Place the new seal over the impeller, noting which side is facing up
(the visible side).
For the seal plate section, it is easiest to remove the old seal from
behind with a flat head screwdriver.
Push the seal out.
Turn the plate back over and insert the 2nd part of the seal into the
plate with the larger white side facing up. It is a tight fit so be sure to
push the seal all the way down.
Reattach the seal plate to the motor mounting plate. Notice that the
notch at the top of the seal plate aligns with the gap at the top of the motor
mounting plate.
Note: A good time to check for debris stuck in the openings is before
reattaching the impeller.
Screw on the impeller by hand.
To get it in tight, the back the new motor will need to be removed to
expose the rear of the impeller shaft.
Using the 9/16 open ended wrench, hold the shaft still while tightening
the impeller by hand.
Note: At this time, I also removed the plastic plug that the power
conduit elbow will connect to.
Note: Since the bonding wire holder was removed when pulling the
pump out, this new holder on the new motor will also need to be removed. When
the pump is back in place, the old bonding wire clip will be used.
Place the impeller ring back on to the impeller with the lip side
facing away from the motor.
The volute (diffuser) can now be reattached to the seal plate. It is
pushed on, and then turned clockwise until it will not turn any further.
Connecting the motor to pump
housing
Note: If you have it, replace the o-ring on the end of the volute
(diffuser) now. If you don’t have a new o-ring, make sure the old o-ring is
still attached at least.
Note: Make sure that the seal plate o-ring is on the seal plate.
This is critical to help prevent leaks. Ideally, this should be replaced with a
new o-ring anytime the pump is opened.
Pull the motor locking ring back over the new motor.
To attach the new motor to the front of the pump housing, the motor
will need to be inserted at an angle because of the locking ring.
Notice how the motor mounting plate has a tab on top that matches a
groove on the pump housing. Align these two and push the motor in to the pump
housing.
The motor mounting plate needs sit all the way down so the surface is
flat between the mounting plate and the housing. This can be difficult to do
but I have found it is better to push the motor in to the housing quickly in
one motion rather than to try and push slowly but with more force.
Once the two are reattached, the locking ring needs to be tightened
between them. Notice the “open” and “closed” marks on the ring. These will line
up with the top of the pump. Align the “open” mark, push the forward away from
the motor towards the pump, and then pull the handle down until the “closed”
mark aligns with the top. If you cannot turn your ring, the motor needs to be
pushed further into the pump.
Reattach the clip to preventing the motor ring from moving.
Attach the elbow for the power lines to the back of the motor. Screw in
the elbow by itself, then from the inside of the motor screw on the nut to the
section of the elbow sticking through.
Note: If you moved your pump to work on it, place it back to its
original position. When connecting the two unions, check that each still has an
o-ring.
How to wire the new motor
Note: Ensure that the power is off before starting these next steps.
If you are not 100% certain the power is off, do not proceed any further.
The loose wire ends need to be pulled through the elbow. The tips of
the wires may need to be flattened out. It is generally easier to pull one wire
at a time.
Once all the wires are pulled through, pull the conduit up to and into
the elbow.
Tighten the nut over the conduit on the elbow.
Inside the motor, you will see “L1” and “L2.” Each power (hot) wire
will attach to one of these.
In this specific case, the wires had clips on the end that attached to
the ends of the “L1” and “L2” connectors.
Note: Normally, the wire ends are stripped, then bent into a hook
shape and held down with the screws in “L1” and “L2.”
The grounding wire needs to be connected to the pump. The end of the
wire needs to be stripped and turn into a hook shape small enough to fit under
the green grounding wire hex head screw.
Attached the back cover to the pump and tighten the two hex head
screws.
Reattach the bonding wire to the back of the pump.
Open the pump lid and fill the pump basket area with water. Close the
pump lid when the pump is full of water.
Turn the power of the pool equipment back on. Then, turn on the pump
that the motor was just installed on.
If the pump does not power on, check all breaker switches. If it still
does not power on, check the wiring on the pump as well wires in the
timer/automatic controller. It is rare that a motor will be dead on arrival;
however, it is possible especially if it was dropped during transit.
If the pump turns on but will not catch prime, check that pump lid is
tight. If it still will not catch, then check that the lid o-ring is still in
place.
If it still does not work, check that the front union is tight. It is
possible that the o-ring in this union is missing or worn out and will need to
be replaced.
If the pump leaks from its mid-section, either the motor and pump
housing were not push far enough into each other or the seal plate o-ring is
bad and needs to be replaced.


Thanks on behalf of sharing superb in order. Your web-site is same cool. I am impressed by the info that you have proceeding this situate. It reveals how nicely you perceive this subject. Bookmarked this web side, will be as long as in exchange on behalf of more articles.
ReplyDeletepool heat pump store
Thank you on behalf of sharing you nice post.i am impressed by your info.Hayward pool cartridges come in varied sizes, so you can choose one that best suits the need of your pool depending upon the size and requirement.
ReplyDeleteThis comment has been removed by the author.
ReplyDeleteHi! I would like to share this great online resource for anyone seeking an Impellers pumps: http://www.nauticexpo.com/boat-manufacturer/impeller-pump-18202.html
ReplyDeleteYour instructions and pictures saved me having to pay someone to do this. Thank you!
ReplyDelete