
Pentair IntelliBrite 5G by Wine
Country Pools & Supplies
This is a short review and walkthrough of the installation of a Pentair
IntelliBrite 5G underwater color changing LED light for spas (Part number 640233) by www.WCPandS.com.


Light information:
The IntelliBrite 5G is a multicolored light. Turning the light on and
off will change the color and/or mode.
For greater control, an IntelliBrite controller (Part number 600054)
can be purchased separately and installed to directly control the light modes.
The IntelliBrite Spa LED light uses just 18 watts (but lists a possible
maximum of 40 watts) compared to the non-LED 60-250 watt Spa lights. The LED
version costs about 3 times as much as the standard version.
The light fixtures come in both 12V and, more commonly, 120V wattage
versions. Each version also has 3 available cord lengths- 50ft, 100ft, and
150ft.
The installation
This will cover the installation of our Pentair IntelliBrite 5G underwater
spa light. Certain installation steps may vary. For full instructions on installing
this light, see the manual that accompanies it.
Tools Used:
Wire cutters/strippers
Phillips head screwdriver
Electrical tape

The LED light will replace an existing Pentair SpaBrite light so the existing
housing will fit the new LED light fixture without any modification.
Disconnect the power: First, turn off the power for all pool and
spa lights at the breaker box.

Locate and open the junction box for the lights. It is usually around
the pool/spa area but may be near the pool/spa equipment.

Before proceeding any further, make a note (and possibly a picture) of
how all the wires in this are connected. After the installation, everything will
need to be connected in the same way.
Just the spa light that will be replaced needs to be disconnected. To
find the correct set of wires, disconnect all but one set and then turn back on
the breakers for the lights. Now the lights are turned on to see which light
has powered on.
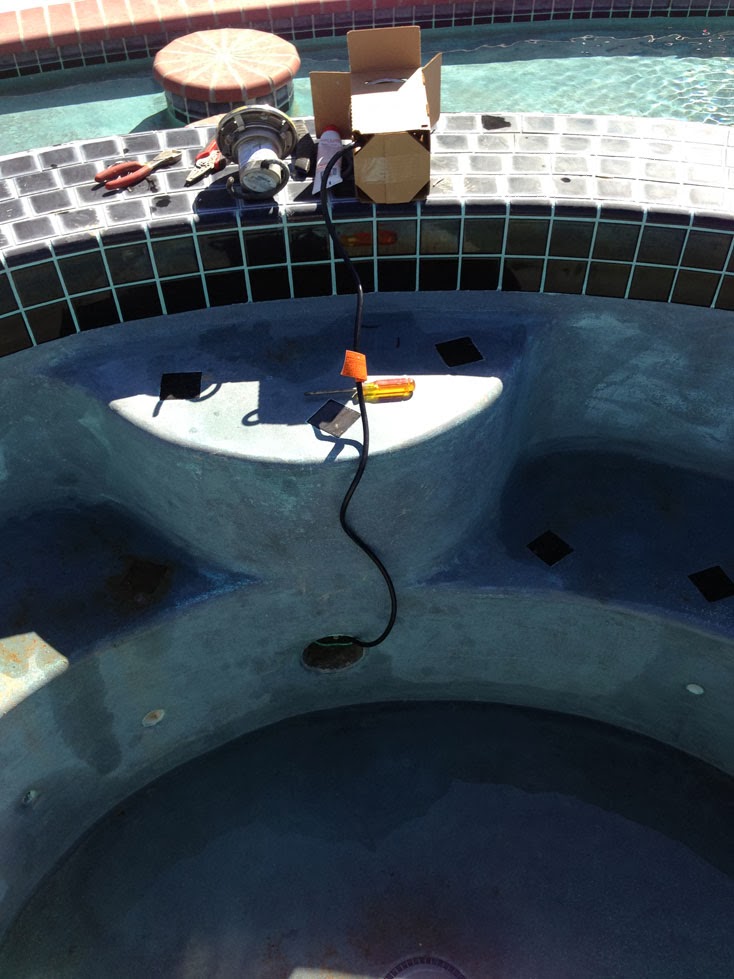
Drain the Spa: For this specific installation, the spa sits 3
feet above the pool water line. The spa was drained in to the pool by changing
a valve position and turning on the pool pump.
Remove the old light while pulling the new light through:
There is a single screw holding the old spa light in place. Remove it
with a Phillips head screwdriver.

The light can now be pulled out.


The cord was cut near the end of the old light fixture.

4 inches of the black rubber casing was cut and removed from the wires.

The new wire will be attached to the end of the old wire and then
pulled though the existing line, running underground from the fixture housing
to the junction box.
The end of the old wire needs to be attached to the end of the new wire
using the electrical tape. The connection between them needs to be strong but
also thin enough to fit through the conduit pipe underground.


The new wire is stretched out. It will then be easier to guide while pushing
it though the existing pipe.

It helps to have two people-one to pull the wire at the junction box
and the other at the fixture housing to guide the wire though and tell the
other person to stop when enough wire has been pulled though.

Note: Do not try to splice the new light fixture directly in to the
old wire. This wire needs to be water and weather-proof.
The length of the wire from the light to the fixture should be long enough
so the new light can be placed out of the water on the side of the spa in case
it needs to be opened for maintenance.
Wire the new light:
Cut or remove the tape connecting the new and old wires at the junction
box.
The new cable needs to be cut and spliced with enough length to connect
the new wires to the wires going to the power box but short enough to fit under
the lid of the junction box.

On the new cable, there will be 3 wires-Hot (black or red), neutral
(white) and ground (green). These need to be connected exactly the way the
wires from the previous light were connected.

Note: Usually, wires that are the same color will be connected but
this is not always the case.
Placing the new light:

The new LED light will be placed into the old fixture housing. Wrap the
cord around the light fixture and push it into the housing, making a note of
the top of the fixture (with the screw hole).


The spa can now be refilled with water to its original level.

Final thoughts
Installation was easy since the IntelliBrite 5g Spa light fit in to the
older Pentair SpaBrite fixture housing.
At night, the LED lights are bright but not as bright as the
incandescent version it replaced.
I couldn’t find any information on how long these lights last, but LED
lights generally last longer than incandescent ones. However, Pentair makes no
claims in the documentation of length of life on these. At a cost of 3 times as
much for the LED version, it doesn’t seem like a good way to go to save money
over the lifetime of the light.
The multicolored lights are definitely a great way to add some
character to your spa so if price is not an issue, try the IntelliBrite 5G Spa
light.


