How to clean a Pentair Clean & Clear Plus cartridge filterOf the three most popular filter types (DE, cartridge and sand), cartridge filters are the easiest to open and clean. written by www.WCPandS.com. This guide is meant to show others step by step how easy it is to clean their cartridge filter if they want to do it themselves.
The filter in this example is a Pentair Clean & Clear Plus filter.
Other filters from major manufacturers (Hayward, Jandy, Jacuzzi, Waterway etc.)
have similar steps for cleaning and will very a little.
Items needed:
- Flat head screwdriver
- Water hose connected to faucet
- Ratchet and socket or 12 point wrench or crescent wrench (a 7/8 12
point closed wrench was used in this example)
Starting:
Make sure that the pool system is off and will not turn on
automatically. The easiest way to ensure this is to switch the pump breakers to
the off position.
Open the air relief valve on the filter to relieve internal pressure.
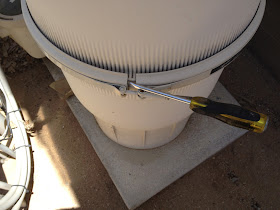
Remove the band from the filter:
Note: The brass bolt many filters use to hold the band is easy to
damage. Do not use pliers to remove this bolt. Use a correct sized ratchet, or crescent
wrench only.
Note: Take note of the space between both ends of band. When putting
the filter back together, you will want to tighten the bolt to about this same
position.
There is usually a bolt, two washers, and a spring. Remove the bolt and
all of the pieces on and around it.
Note: In this example, although one washer was missing, it did not
affect the filter.
The band can now be removed. You may need a flat head screwdriver to
pry the band off.
It should just pull off and away
from the filter.
The top section of the filter can be pulled straight up. Again, you
might need a flat head screwdriver to pry the top section from the bottom.
Note: If the filter is under pressure, it can be extremely difficult
to remove the lid. If you cannot remove the lid, check to see if the air relief
valve has been opened.
Note: It is possible that the filter O-ring has expanded, making the
lid difficult to remove. If this is the case, more than one flat head screw
driver would be needed to pry the lid off.
Removing the filters:
On top of the cartridges is a manifold. This manifold creates a seal so
that water cannot enter the cartridges from their top end. This manifold is
pulled straight up and off. If it seems stuck you can use the flat head
screwdriver to pry it loose.
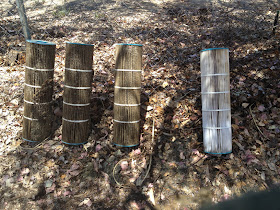
Each filter cartridge can now be pulled straight up and out. Each
cartridge is exactly the same. There is no order to the placement or up/down of
these so there is no need to note where each sits.
Cleaning the cartridges:
For 90% of all cartridge cleanings, they will just need to be hosed off
with water. To get as much dirt and debris out as possible, a nozzle is
recommended.
Note: In some cases, spraying acid directly onto the cartridge is
needed to remove stains. Acid cleaning filter cartridges can be difficult to
handle and is not recommended for the average person. Acid can burn skin, kill
plants and corrode metal. It is better to leave acid cleanings to professionals.
Check each cartridge for holes or tares and replace the cartridge(s) if
any are found.
Reinserting the cartridges and
placing the top half on:
Place each cartridge back into the filter with the bottom sitting on
one of the open bottom manifold openings.
Once all are back in, set the top manifold on top of all cartridges and
make sure that there are no visible gaps.
The upper half of the filter can now be placed back on to the filter.
If the lid will not sit, flush with the bottom half make sure that the
air relief valve is still open.
If the lid still will not sit correctly, the filter o-ring may need to
be replaced. See your local swimming pool store for a replacement. They will
need both the filter make and model.
Reattaching the bolt:
Place the band on and around the filter, pulling the screw though the
center of the other end. The band will not fit if the top half is not sitting
down flush with
the bottom half.
The order of items on the bolt should be: small washer, spring, large
washer.
You can only screw on the bolt if at least a small section of the
screw is visible. Once you tighten up the bolt, it will pull the screw further
though. Remove the bolt and add the washers and spring.
Once the bolt is on and tightened as close to its original position as
possible, the system can now be switched on (the pump).
Once the air is out of the filter, close the air relief valve and you are done.


I found this post useful.I was trying to find this. Really refreshing take on the information. Thanks a lot
ReplyDeletehttp://www.dinodierensuper.nl/vijverpompen.html
This was very helpful.
ReplyDeleteThank you. This was very helpful. Great with all the pictures too!
ReplyDeleteThis guide is incredibly helpful — thank you for breaking down each step so clearly! At KT Pool Services, we often guide our clients through basic maintenance steps, and this post is a great reference. The safety reminders about pressure release and proper tool usage are spot on. Also, the note about cartridge placement being non-directional is a huge time-saver. Appreciate the detailed walkthrough — it's a great resource for both professionals and DIYers. Keep the quality content coming!
ReplyDelete